Sunday, September 16, 2007
FEBMOMMY
This blog is dedicated to all my FEBMOMMY patterns... I have now transferred them all to this site so I don't have to worry about the page being over done at yahoo/geocities so please bookmark this site so you have it... I am going to do some changes to the sites but I wanted to add the patterns here....
Lilo and Stitch (Lilo's top)


bead placemnt picture
Sydney's Lilo top from Lilo and Stitch movie
aug 2002
Need:
Red worsted weight yarn
contrasting felt
6x9 mm pony beads several
H hook
Row 1: Ch 60, dc in 4th chain from hook and in each chain across. (58 dc)
Row 2: Ch 2, turn. Dc in same stitch. * skip 2 chains, 3 dc in next stitch, * across to last stitch. Dc in last stitch. (ch 2 doesn't count as first st. (56 dc = 18 shells +2 dc's)
Row 3: Ch 2, turn. Dc in same stitch, dc in first space, dc in each dc across but also do a dc in the space before last dc too. (58 dc).
Row 4: Ch 2, turn. Dc in same stitch, dc in each across. (58 dc)
Row 5: Rep row 2.
Row 6: Rep row 3.
Row 7: Ch 1, turn, sc in same stitch, * ch 2, sc in next stitch, * across, sc in last stitch, fasten off. weave in ends.
Finishing:
cut 6 strands of Red yarn to use for ties mine are 24" long. Fold first tie in half in first corner pull the loop thru and put the ends in and pull tight, this should make 2 ties in the corner, do for the other 3 corners.
Fold the top in half to get the center. you will do the ties in sc's to each side of the center.
so now you have 6 areas and 12 strings for beads.
Beads:
add as many beads per string as you like but make them equal on the strings. In the picture I used green and purple..Sydney's favorite colors and it went with her grass skirt and leis. The beads are for decoration and weight on the strings. I have a picture of the center top bead placement I did.
To make the top, for the kids to wear, you add felt to the inside. I did mine in contrasting felt to show the stitching. You can make it washable by sewing the felt on. Mine was hot glued to the top, but you can even use fabric glue. Hope you like it.
Octopus Cat Toy

Jan 2004
Need:
worsted weight yarn and G hook or sport weight yarn and B-1 hook (the smaller one will make a smaller octopus.)
2" circle of plastic canvas, I used a 3" and cut 3 hole rows around and cut the center cross out for adding things to the toy.
needle to sew it up
stuffing for the head, (can be extra yarn pieces, catnip in a cloth, stuffing for toys, jingle bells)
I am using catnip spray for this toy but you can add it inside the toy.
To make it a toy with a helpful hand to make it move, I would use a yarn string, a washer to secure it inside the head, and a stick to make it one that can be like the feathers in the store...Will show a picture of that one soon.
Directions:
Ch 5, slip stitch to first ch to form ring.
Rnd 1: Ch 3, 11 dc in ring. Slip stitch to 3rd ch of beg ch 3. (fisrt ch 3 is first dc) (12 dc)
Rnd 2: Ch 3, dc in same st, 2 dc in each stitch around. Slip stitch to top of ch 3. (24 dc).
Rnd 3: Ch 3, dc in same stitch, * dc in next st, 2 dc in next st, * rep around, slip stitch to top of ch 3. (36 dc).
Rnd 4: Ch 3, dc in next stitch and around, slip stitch to top of ch 3. (36 dc).
Rnd 5: Ch 3, dc in same stitch, dc in next 8 sts, * 2dc in next st, dc in next 8 sts, * rep around, slip stich to top of ch 3. (40 dc).
Rnd 6: Rep Round 4. (40 dc).
Finish off but leave enough tail to sew it around plastic canvas circle, If you want to add jingle bells, or catnip in cloth do so before finishing off. Once the catnip wears off(if you put it in) you can spray lightly with cat nip spray. once sewed together, weave in ends.
Rnd 7: Attach yarn to the post of any dc in rnd 6, ch 1, sc around post, and around each post. slip stitch to first sc. (40 sc).
Rnd 8: ch 1, sc in same st, 3 dc dec in next 3 sts, ch 27, sc in second ch from hook to last ch.(first leg), * sc in next 2 sts, 3 dc dec in next 3 sts, ch 27, sc in 2nd ch from hook to last ch, * around, (last one will be 1 sc and slip stitch to first sc. Finish off and weave in ends...
I added the stuffing at the end and used a hook to push it thru the hole at the bottom of the circle...This toy can be washed, but I would not dry with heat in the dryer, I would have it on fluff, because of the plastic canvas in it...and if you make it for someone as a gift, please add my website to the card and please let them know about the cat nip spray and about the dryer as it will melt from the heat.
Hunter's Warm and Comfy Scarf
Pic coming soon!
Hunter's warm and comfy scarf
June 2002
Need:
Worsted weight yarn
K hook
fpdc: (front post double crochet): yarn over, insert hook around post of next stitch, from right to left, yarn over and complete as a usual dc.
(left to right for lefties)
Row 1: Ch 36, sc in second stitch from hook till end. Ch 2, turn. (35 sc)
Row 2: (the ch 2 above is hdsc now and throughout); *Fpdc arond next sc, dc in next sc, * repeat till end, hdc in last st. Ch 2, turn.
Row 3: *dc in fpdc, fpdc in next dc,*rep till last st. Hdc in last st. ch 2, turn.
Row 4: *fpdc in dc, dc in fpdc, * repeat till the end, hdc in last st. ch 2, turn.
Rep rows 3 and 4 till you have the length you want, I added frindges to the short ends.
When you get the length you want, do a sc row at the end and fasten off.
One of my husband's students, loved Hunter's scarf and we gave it to him and I didn't get a picture of it first.
Hunter's Square

Hunter's square/washcloth...
December 2003
I made the example out of worsted cotton as a washcloth but you can make a square for exchanges out of worsted weight yarn.
It came out to 5 1/2" for me but I crochet very tightly, so it may be a 6" square for someone who crochets loosely.
Ch 5, slip stitch to form ring.
Rnd 1: Ch 3, 11 dc in ring. Slip stitch to top of ch 3. (12 dc).
Rnd 2: Slip stitch to space between 2 dc's, ch 4, *dc in next space, ch 1, * around. Slip stitch to 3rd ch of beg ch 4. (12 dc, 12 ch 1 spaces)
Rnd 3: Slip stitch to ch 1 space, ch 6, dc in same st (makes first corner), ch 1, (dc,ch 1, dc, ch 1)in next space 2 times, (dc, ch 3, dc) in next space(2nd corner), * ch 1, (dc, ch 1, dc, ch 1)in next space 2 times, (dc, ch 3, dc) in next corner, rep * around. Slip stitch to 3rd ch of beg ch 6.
(in this next round, skip the dc's that make up the corners)
Rnd 4: Slip stitch into corner space, (ch 3, dc, ch 2, 2 dc) in corner space, (ch 1, dc in next dc) 4 times, ch 1, (2 dc, ch 2, 2 dc)in next corner, *(ch 1, dc in next dc) 4 times, ch 1, (2 dc, ch 2, 2 dc)in next corner, rep * around. Slip stitch to 3rd ch of beg ch 3.
Rnd 5: Ch 4, tr in next dc, (tr, ch 3, tr) in corner space,skip next space, ch 2, tr in next space, (ch 1, tr in next space) 2 times, ch 2, tr in next 2 dc, (tr, ch 3, tr) in corner space, tr in next 2 dc, * skip next space, ch 2, tr in next space, (ch 1, tr in next space)2 times, ch 2, tr in next 2 dc, (tr, ch 3, tr) in corner space, rep * around. Slip stitch to 4th ch of beg ch 4.
Rnd 6: Ch 1, sc in same space, sc in next tr, hdc in next tr, (2 sc, ch 2, 2 sc) in corner space, hdc in next tr, sc in next 2 tr, 2 sc in ch 2 space, sc in each tr and ch 1 space and 2 sc in the ch 2 space, sc in next 2 tr, hdc in next tr, (2 sc, ch 2, 2 sc)in corner space, *hdc on next tr, sc in next 2 tr, 2 sc in ch 2 space, sc in each of the tr and ch 1 spaces till ch 2 space and do 2 sc in it, sc in next 2 tr, hdc in next tr, (2 sc, ch 2, 2 sc) in next corner, rep * around. Slip Stitch in first sc.
Finish off and weave in ends.
Cobweb Duster

aug 2002
Need:
small amount of worsted weight yarn
crochet hook size H
and a latch hook (but can do without it if don't have one)
The duster ties to the end of a mop or broom handle.
Ch 5, join to form ring.
Rnd 1: Ch 1, 10 sc in ring. Join to first sc with a slip stitch.(10 sc)
Rnd 2: Ch 2, sc in same stitch, 2 sc in each sc around. Join with a slip stitch to the top of the ch 2. (20sc) The ch 2 is the first sc.
Rnd 3: Ch 2, dc around. Slip stitch to the top of the ch 2. (ch 2 is the first dc here).
Rnds 4-8: Rep round 3.
Rnd 9: Ch 2, hdc around. (ch 2 is the first hdc here) slip stitch to the top of the ch 2.
Rnd 10: Ch 2, dc around. slip stitch to the top of ch 2.
Rnds 11-14: Ch 1, sc around, slip stitch to the first sc.
Rnd 15: Ch 2, hdc around. Slip stitch to the top of the ch 2.
Rnd 16: Ch 1, sc around. slip stitch to first sc. Fasten off.
Finishing directions: cut some yarn in 4"lengths. You will latch hook them to the top rounds of the duster...You can do as many or as little as you want...In the example, I did about 4-5 rows on the duster..
If you don't know how to latch hook, you can tie the yarn to the duster and knot it on.
then cut a yarn about double the circumference of the duster and weave it thru Rnd 15. This will be the tie to hold it on the pole.
you could put some fabric glue on the inside to keep the yarn that is ties or latch hooked on the duster to wash the dust and cobbies away...but you can rinse it off and let dry too.
Hope you like it.
Octopus Scrubby


by: Bren G.
August 2003
Special stitch:
dc dec: dc in first dc till 1 loop left dc into next dc till 3 loops left go thru all 3. you have made 2 sts to 1.
Need:
nylon scrubbie (found at most grocery stores, Wal-mart, Kmart, even some dollar stores)
contrasting worsted weight cotton yarn
size g hook.
Round 1: Slip stitch cotton yarn to nylon scrubby, ch 1, and do 40 sc evenly around the circle. slip stitch to first sc. (40 sc)
Round 2: Ch 3, dc in next st and around, slip stitch to top of ch 3. (40 sts). it will start to cup around, you want it to...
Round 3: Ch 2, dc in next st(first dc dec), dc in next 3 dc,* dc dec, dc in next 3 dc,, * around..slip stitch to top of first dc dec. (32 sts) ( it makes 8 dc dec, and 25 reg dc)
Round 4: Ch 1, sc in same st, and each stitch around. slip stitch to first sc.(32 sts)
Round 5: Ch 1, sc in same st, sc in next sc, ch 20(first leg)sc in second stitch from hook and last ch, sc in next 4 sc in loop, * ch 20, sc in second chain from hook till last ch, sc in next 4 sc, * around till last. it will be only 2 sc and slip stitch to first sc.
Fasten off and weave in ends. Enjoy.
My Scrubby

My scrubby pattern
may 2002
need:
cotton yarn 1 ball
Round plastic scrubby pad
crochet hook size G
V-st (dc, ch 1, dc ) in same stitch
Round 1: attach yarn to scrubby, ch 1 and do 32 sc evenly around. join with slip stitch to first sc. (32 sc).
Round 2: Ch 3, (counts as first dc now and throughout), dc in same stitch, dc in next 7 sc, (2 dc, ch 2, 2dc) in next stitch, dc in next 7 sc, (2dc, ch 2, 2dc) in next stitch, dc in next 7 sc, (2dc, ch 2, 2dc) in next st, dc in next 7 sc, 2dc in same stitch as first dc, ch 1, sc in first dc to form space.
Now you will be working on two sides, so you will be going from 1 space to the middle space then to the last space...
Round 3: Ch 3, turn, dc in space, ch 2, skip 2 dc, *3 dc in next dc, ch 2, skip 2 dc; rep from*across to middle. (2dc, ch 2) twice, skip 2 dc, ** 3 dc in next dc, ch 2, skip 2 dc,rep from ** to corner, in corner space, 2 dc.
Round 4: Ch 3 turn, dc in next stitch, ch 2, dc in each if the next 3 dc, ch 2, dc in next 3 dc, ch 2, dc in next 3 dc, ch 2, (2dc, ch2) twice in center space, skip 2 dc, dc in next 3 dc, ch 2, dc in next 3 dc, ch 2, dc n next 3 dc, ch 2 dc in last 2 dc.
Round 5: Ch 3, turn. dc in next stitch, V-st in next space, dc in next 3 dc, V-st in space, dc in next 3 dc, V-st in space,dc in next 3dc, V-st in space, dc in next 2 dc,(dc, ch 2, dc)in center space, dc in next 2 dc, V-st in space, dc in next 3 dc, V-st in space, dc in next 3 dc, V-st in space, dc in next 3 dc, V-st in space, dc in last 2 dc.
Round 6: Ch 3, turn, dc in next 2 dc, ch 1, dc in next 5 dc, * ch 1, dc in next 5 dc, rep * til center sp((the dc's around space will be 4 instead of 5))in center(dc, ch 2, dc), dc in next 4 dc, * ch 1, dc in next 5 dc, rep to end, in end, dc in last 3 dc.
Round 7: Ch 3, turn, dc n each dc and space to center space (dc, ch 2, dc), dc in each space and dc to end.
Rep rounds 3-6 once more to pattern...
Round 8 note:
in the end area, it will be dc in each dc, not in space...
Round Coaster

My Round Coaster
Feb 2002
Need:
cotton worsted weight yarn
size g hook
Ch 5, join to form ring.
Rnd 1: Ch 3, 15 dc in ring. slip stitch to 3rd ch of beg ch 3. ( 16 sts)
Rnd 2: Slip stitch to space between next dc. Ch 4, (counts as dc and ch 1), dc, ch 1 in each space around. Slip stitch to 3rd ch of beg ch 4. ( 16 dc and ch 1 spaces)
Rnd 3: slip stitch in next ch 1 space, Ch 5, dc in same space( counts as first V st), (dc,ch 2,dc) in each ch 1 space around.slip stitch in 3rd ch of beg ch 5 space.( 16 V sts)
Rnd 4: slip stitch in space of V stitch,ch 3, 2 dc in same space,ch 2, (3dc in next space, ch 2 ) around.slip stitch in 3rd ch of beg ch 3.
fasten off and weave in ends.
Square Coaster

My Square coaster
By: Brenda G.
Feb 2002
Need:
some cotton yarn and G hook
Ch 5, join to form ring.
Rnd 1: Ch 3, 11 dc in ring. join with 3rd ch of beg ch 3. (12 dcs)
Rnd 2: slip stich to the SPACE between dcs. Ch 4, (equals dc and ch 1) dc, ch 1 in each space around. Join to 3rd ch of beg ch 4.(12 dcs and ch 1 spaces)
Rnd 3: slip stitch in next space, Ch 3, dc, ch 2, 2 dc in same space, (ch 1, dc in next space) 2 times. ch 1, (2dc, ch 2 2dc) in next space. (Ch 1, dc in space) 2 times. ch 1, (2dc, ch 2, 2dc) in next space, (ch 1, dc in space) 2 times. ch 1, ( 2dc, ch 2, 2dc) in next space (ch 1, dc in space) 2 times. Ch 1, slip stitch in 3rd ch of beg ch 3.
Rnd 4: slip stitch to ch 2 space.(ch 3, dc, ch2, 2dc) in same space, (ch 1, dc in next space) 3 times, ch 1, (2 dc, ch 2, 2dc) in next space. (ch 1, dc in next space) 3 times, ch 1,(2dc, ch 2, 2dc) in next space.(ch 1, dc in next space) 3 times, ch 1, slip stitch in 3rd ch of beg ch 3.
Fasten off here or you can cont. and make it bigger..
Flower Coaster

August 2003
need: worsted weight cotton
size G or H hook
pattern notes:
V-st = (dc, ch 2, dc) for this pattern
I try to design patterns that do not have a gauge. It should be the size of a regular coaster.
Ch 5, slip stitch to first chain to form ring.
Rnd 1: Ch 3, (counts as first dc, now and thru out), dc in ring, ch 3, * (2dc, ch 3) rep * 3 more times, slip stitch to the top of ch 3. 5(2dc) groups.
Rnd 2: Slip stitch into the space between 2dc, ch 5, dc in same space(first V-st), (V-st, ch 3, V-st) in ch 3 space, skip nxt dc, * in spaces between 2 dc, V-st, in ch 3 spaces,(V-st, ch 3, V-st), * around. Slip stitch to the 3rd chain of beg ch 5.
Rnd 3: Slip stitch into ch 2 of V-st, ch 1, sc in space, ch 3, sc in space of next V-st, in ch 3 space between the 2 v-st, (sc, ch 3, sc), sc in next V-st, ch 3, *sc in next V-st, ch 3, in ch 3 space between the 2 V-st,(sc, ch 3, sc), follow* around, after last sc, ch 3, slip stitch in first sc.
Rnd 4: Ch 3, V-st in ch 3 space, dc in each of the next 2 sc, * dc in each of the sc, and V-st in chain 3 spaces around. Slip stitch to top of ch 3. Fasten off and weave in ends. Hope you enjoy your coaster.
Wednesday, July 11, 2007
Hey all FEBMOMMY
will hopefully be all over here on this blogspot so no one will have to have the screen of death and wait for the hour to be over there....
Just wait it will be soon....
Thanks,
Bren
Just wait it will be soon....
Thanks,
Bren
Tuesday, November 14, 2006
Open Top Mittens
Open Top Mittens
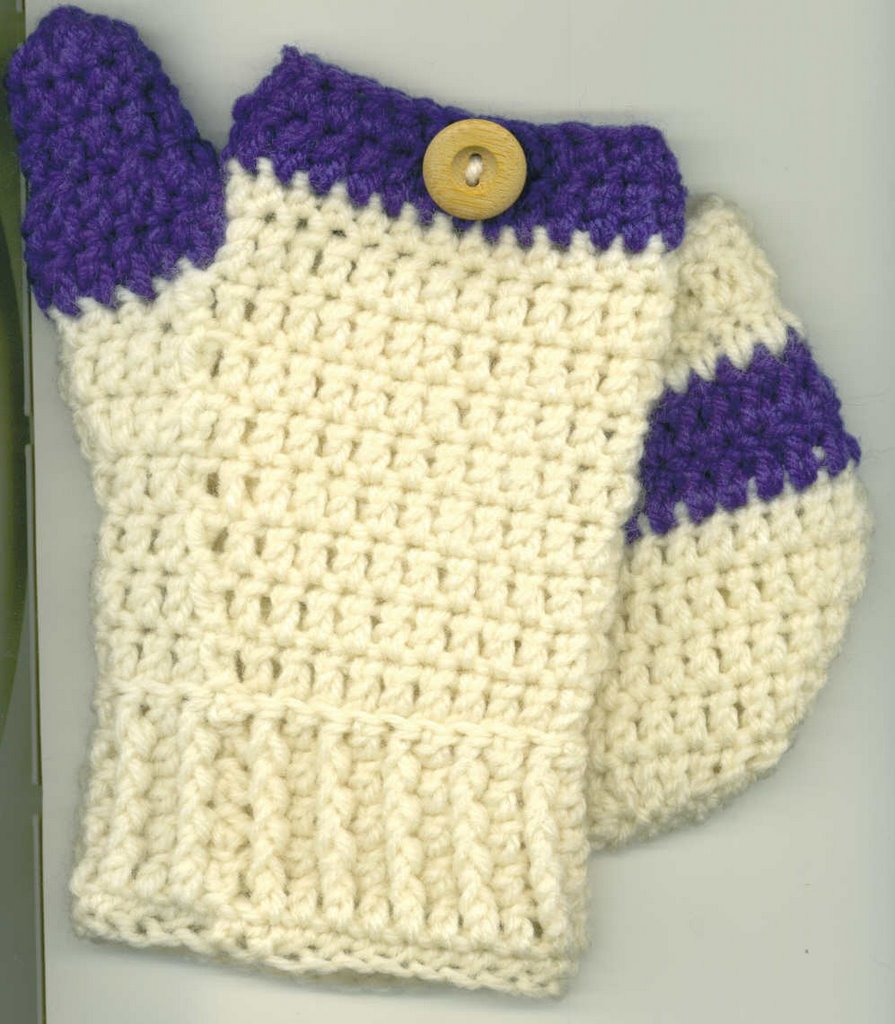

need: worsted weight yarn in one or few colors
G hook for smaller hands H, I, J hooks for larger.
button that can go thru a double crochet
needle and thread or small yarn needle that will go thru the holes in the button.
Starting with wrist
1: Ch 30, join to form ring. Be careful not to twist chain and can make a larger wrist by adding a few stitches in even numbers.
2: Ch1, sc in same st and in each around. Slip stitch to the first sc (30 sc)
3: ch 3, Dc in around, ch 3 is the first dc.slip st to the 3rd ch of ch 3.
4: Ch 3,* FPdc in next st, Dc in next st* rep between stars til the end on round and sl st in the 3rd ch of beginning ch 3.
5-7: Rep round 4.you can continue more for a longer cuff.
Turn inside out.
8: ch 3, dc in back loops only in this round. sl stitch to ch 3 of beg ch 3.
9-11: ch 3, dc in next stitch and around. slip st to the 3rd ch of beg ch 3.
12: ch 3, dc in next st and around, till last 4 sts, 2dc in last 4 sts.slip stitch to 3rd ch of the beg ch 3.
13: ch 3, dc in next st and around. Slip stitch to 3rd ch of beg ch 3.
14: ch 3, dc in next and till last 9sts, in last 9 do a hdc in each of the last 9, sl st to the 3rd ch of beg ch 3.
15: ch 3, dc in each dc and 1st hdc, sl st to ch 3, leaving the 8 sts,(that is the area the thumb will go.)
16: ch 2, hdc around, fasten off. weave in ends. or you can go dc around, hdc around to make it longer for bigger or longer fingers.
Thumb
{you can do more of 3-4 for a longer thumb area.}
1: attach yarn,( I have blue here, but you may use the same as mitten,)ch 3, dc in next st and around.(around the post of the 2dc, do 2dc and sl st to the ch 3 of beg ch 3.
2: ch 3, *dctog in next 2 sts, dc in next st,* around in last 2 sts, do a dc in each.
3: ch 3, dc around, sl st to ch 3 of beg ch 3.
4: ch 2, hdc around, sl st in ch3 of beg ch3.
5: Ch 1, yo, hdc in next and thru all loops,* hdc tog in next 2 sts, around. rep * around.( the yo and hdc is a hdc tog for this pattern. finish off.
top piece of mitten
Ch 11, dc in 4th ch from hook and in till last st do 2 dc in it, going to other side, do dc in the free loops.
1: ch 3, dc in same st, 2dc next one, dc in next 6 sts, 2 dc in each of next 3 sts, dc in each of the next 6 sts, 2 dc in next st, sl st to ch 3.
2: ch 3, dc in same st, in next 2 sts, do 2 dcs, dc in next 9 sts, 2dc in next 3 sts, dc in next 9 sts, sl st to ch 3.
3: Ch 3, dc in next 3 dc, (in next 3 dc, dctog), dc in next 17 sts, (in next 3dc dctog), dc in next 3 dcs. sl st to the ch 3.
4-7: ch 3, dc in each st around, sl st to ch 3.
8: ch 2, hdc in each st around.
fasten off and weave the ends in.
sew button to back of hand to hold top of the mitten (to keep it open) Also sew both mittens differently so as the buttons are on the place in both hands.
Wednesday, December 28, 2005
Muffin's cat ball

Muffin's cat ball
July 2002
Needed:
small amt of ww yarn
G hook
jingle bell
Ch 5, join to form ring.
Rnd 1: Ch 1, 10 sc in ring. Slip stitch to first sc. (10 sc)
(ch 2 is first hdc now and thruout)
Rnd 2: Ch 2, hdc in each sc. Slip stitch to 2nd ch of beg. ch 2. (10 hdc)
Rnd 3: Ch 2, hdc in same stitch. 2 hdc in each stitch around.Slip stitch to 2nd ch of beg ch 2. (20 hdc) fasten off.
Repeat rnds 1-3 but leave long tail for sewing the halfs together.
You can have several different colors together...great scrap yarn project.
Muffin's cat tunnel

Muffin's Cat Tunnel
June 2002
Need:
3 9" craft metal rings
size K hook
3 8 oz. skeins of yarn
(if want bigger tunnel will need more yarn)and if you want a larger circumference use 12" rings or smaller rings less yarn and so on
Embellishments for tunnel if your cat likes them..
Like tying catnip toy to dangle at end of tunnel...
Round 1: With first ring and using 3 strands of yarn throughout, attach yarn to ring, ch 1, ~76 sc around. slip stitch in first sc.(~aprox. you can make it as tight as you want...as the stitches will be the same through the length of tunnel.)
Round 2: Ch 2, dc in next sc and around.(ch 2 is first dc now and throughout pattern.)slip stitch to beg ch 2.
Round 3: Ch 2, dc in next dc and around. slip stitch in 2nd ch of beg ch 2.
Round 4: Ch 3, (counts as first Tr), Tr in next dc and around. slip stitch in 3rd ch of beg ch 3.
Rounds 5 -13: rep rounds 3 and 4 consecutively.
Round 14: Rep round 3
Round 15: Ch 1, attach second hoop by sc around hoop.
Round 16: rep round 3
Rounds 17 - 27: Rep rounds 3 and 4 consecutively.
Round 28: rep round 3
Round 29: Ch 1, attach 3rd hoop by sc around hoop.
You can continue on to another hoop if you want. This tunnel can compact and you can take it anywhere..
Saturday, November 19, 2005
my copyright
You can make the items to sell at craft fairs, bazaars, and local areas, but you may not sell the patterns themselves ever and never can sell online at any craft or ebay like situation. To sell online would have to have written consent by me and my company or we will sue to the extent of the law.
I don't mind if you put a link to my site on websites but to let me know so that I can reciprocate the deal for you.
I have and will update as need be on the copyright but don't take someone's hard work and claim it as your own. There are a lot of hard working designers out there and you don't want to bite the hand that feeds your need for patterns. I don't get paid for my patterns and if I wanted to I would myself sell and not have someone else get my rightful profits.
I welcome pictures and variations of my designs to showcase here or on my blogs and websites I maintain.
thank you,
Bren
woodhill Crochet Design Studio
You can click on my profile to get to my different blogs and pattern pages I do.
Doily coaster

My first doily coaster
By Bren G.
Aug/sept 2003
Need:
size 4 steel crochet hook
size 10 crochet thread
Special stitches:
dc, ch2, dc = wide v-st
dc, ch1, dc = v-st
5dc in same st = 5shell
7dc in same st = 7shell
Directions:
ch 5, slip stitch to form ring.
rnd 1: ch 3, 15 dc in ring. slip stitch to top of ch 3. (16 dc)
rnd 2: slip stitch to space between dc, ch 4, (equals dc, ch1) *(dc, ch1)in space between dc, * around. slip stitch to 3rd chain of ch4.
rnd 3: slip stitch to ch1 space, ch5, dc in same space,(wide v-st made),*(dc,ch2,dc)in next ch1 space, *around. slip stitch to 3rd ch of ch5.
rnd 4: slip stitch to ch2 space, ch3, 2dc in same space, ch2, * 3dc in next space, ch2,*around.slip stitch to top of ch 3.
rnd 5: slip stitch to ch2 space, ch5, dc in same space. (wide v-st made), ch3,* (dc, ch2, dc) in next ch2 space, ch3, *around. slip stitch to 3rd ch of ch5.
rnd 6: slip stitch to ch2 space, ch1, sc in space, ch8, sc in next ch2 space,ch8, *sc in next space, *around. ch8, slip stitch into first sc.
rnd 7: slip stitch in ch8 space, ch3, 11dc in space, sc in next ch8, * 12dc in next ch8, sc in next ch 8, *around. slip stitch to top of ch3.
rnd 8: ch4, (is first dc,ch1), skip next dc, dc in next st, ch1, *skip next dc, ch1, dc in next st, *rep 3 times; **skip next dc and sc, ch6, dc in next dc, ch1, skip next dc, dc in next dc, ch1, skip next stitch, dc in next st, ch1, skip next st, dc in next st, ch1, skip next st, dc in next st, ch1, skip next st, dc in next st, Rep from ** to end. slip stitch to 3rd ch of beg ch4.
rnd 9: slip stitch in ch1 space, ch5, dc in same space, ch1, skip next ch space, wide v-st in next ch1 space, ch1, skip next ch1 space, wide v-st in next ch1 space, (ch1,tr)6 times in next ch6 space,(will be 6tr in one space), ch1, wide v-st in next ch1 space, ch1, skip next sp, wide v-st in next space, ch1, skip next space, wide v-st in next space, *"(ch1,tr)6 times in next ch6 space, ch1,wide v-st in next space,ch1,skip next space, wide v-st in next space, ch1, skip next space, wide v-st in next space, rep * around, ch1, slip stitch to 3rd ch of ch5.
rnd 10: slip stitch to ch 2 of wide v-st, ch4,{firstdc,ch1 made}, 5shell in next wide v-st, ch1, dc in space of next wide v-st, ch3, (sc in next ch1 space, ch3) rep() 4 more times, *dc in space of next wide v-st, ch1, 5shell in next wide v-st space, ch1, dc in next wide v-st space, ch3, (sc in next ch1 space, ch3) 4 more times, rep from * around, slip stitch in 3rd ch of beg ch4. fasten off and weave in ends.
my first try at a doily and it is the size of a coaster. let me know how you like it.
Thursday, November 10, 2005
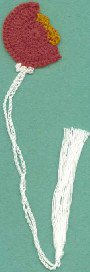
Watermelon bookmark

Designed by Brenda G.
Feb 2002
Need:Red and green #10 thread
size 7 steel hook
4" long cardboard piece for tassel
I used a B hook in sample.
This has been called by my son's class a flower, ladybug, piece of watermelon. So I am saying Flower for the inner circle. You can use any color to make it a flower, but i decided on red and light green for my bookmark.
FLOWER:Ch 6, slip stitch to form ring.
RND 1:Ch3, 17 dc in ring. Slip stitch to 3rd ch of beg ch 3. (18 sts.) Fasten off and weave in end.
PETALS: attach other color Ch 1, sc in same st. * Ch 3, sc in next st, do * around til last dc.ch 65, sc in 6th ch from hook and then slip stitch in each ch til you get to last 2 chs, sc in last dc,ch 3, slip stitch in first sc.
fasten off.
FINISHING:wrap same color as used to make petals around 4" cardboard 20 times, cut at edge, Slip knot to ch 6 at bottom of bookmark, trim edges and weave in any pesky ends.
Hope you enjoy my bookmark.
Granny square bookmark

designed February 2003
need: size 10 cotton threadsize 5 steel crochet hook
cardboard 3" or 4" for wrapping yarn for tail
Ch 7, join to form ring.
Rnd 1: ch 3, 2 dc in ring *ch 3, 3 dc in ring, rep * 2 times, ch 3, slip stitch to top of ch 3. 4 (3dc)groups, and 4 ch 3 spaces.
Rnd 2: slip stitch to ch-3 space,(ch 4 isfirst tr, tr, ch 3, 2 tr) in forst corner, *ch 3, (2 tr,ch 3, 2 tr)in next ch 3 space, rep* 3 timesch 3, slip stitch to top of ch 4.
Rnd 3: Ch 4, tr in next tr, *(2 tr, ch 3, 2 tr)in corner, tr in next 2 tr, 3 tr in next ch 3 space, tr in next 2 tr, (2 tr, ch 3, 2 tr) in 2nd corner, tr in next 2 tr, 3 tr in ch 3 space, tr in next 2 tr, (2 tr, ch 3, 2 tr) in 3rd corner, tr in next 2 tr, 2 tr in ch 3 space,(chain till you get to 10-12" long,drop loop from hook,insert hook into first ch and into dropped loop to make a slip stitch, tr in same ch 3 space ans 2tr, (2 tr, ch 3, 2 tr) in 4th corner, slip stitch to the top of ch 4.
Finish off.
Finishing: Wrap thread around either a 3" or 4" piece of cardboard about 15 times, cut it and slip knot it to the middle of the long chain tail. shape and weave in ends.
Sunday, October 30, 2005
Tootsie roll pop bookmark
Tootsie Roll Bookmark
Designed by: Bren G.
February 2002
I used Red and White #10 thread and small amt. of Brown embroidery floss.
Hook size 4 or 5 steel
cardboard 3 1/2 to 4" long for tassel.
Lollipop:
Ch 5, slip stitch to form ring.
Rnd 1: Ch 3, 15 dc in ring. slip stitch to 3rd ch of beg ch 3. (16 sts.)
Rnd 2: Ch 3, dc in same stitch, 2dc in each stitch til you reach 22 sts including ch 3.
Rnd 3: Ch 2, turn. Dc in first dc. *dc n next dc. 2dc in next dc, * around. 1 dc in ch 3 top.
Rnd 4: Ch 1, turn. Sc around. fasten off.
Tootsie Roll area:
Row 1: attach brown floss to end of Rnd 2;(work toward Rnd 1)Ch 1,2 sc in end of rnd 2, 1 sc in each of the dc in rnd 1 exposed, 2sc in end of rnd 2.
Row 2: Ch 1, turn, sc in first sc, dc in next st,sc in next 2 sts, slip st in next 2 sts,dc in next st, slip stin end of rnd 2. fasten off.
Bookmark:
attach white to red 11 sts from one end, ch 1 sc in same st,ch 3, sc in next st, ch a tail ~12" long and sc in same st, ch 3 sc in next st. Fasten off.
Finishing:
wrap thread around cardboard~ 10-20 times, cut on one end. Slip knot to middle of tail. cut edge straight. weave in pesky ends.
Hope you enjoy the bookmark.
Ballon or Lollipop bookmark

Balloon or Lollipop Bookmark
February 2002
I used Red, and White #10 thread and a little brown embroidery floss.
hook size 4 or 5 steel
3 1/2 or 4" cardboard for tassel.
needle for weaving ends.
Lollipop
Ch5, slip stitch to form ring.
Rnd 1: Ch 3, 15 dc in ring. Slip stitch to 3rd ch of beg ch 3. (16 sts.)
Rnd 2: Ch 3, dc in same stitch. 2dc in each stitch around. Slip stitch to 3rd ch of beg ch 3. (32 sts).
Rnd 3: Ch 3, dc in same stitch, *dc in next st, 2dc in next st,* around. Slip stitch to 3rd ch of beg ch 3. fasten off.
Lollipop stick:
attach white to lollipop. Ch 1, sc in same st, Ch 3, sc in next st,ch 3, sc in next st, chain a 12-13" tail and sc in same sc, ch 3, sc in next st, ch 3 sc in next st. Fasten off.
Finishing:
wrap red thread around cardboard ~10-20 times and cut at end, put to side. Do same for white. Slip knot the threads to the middle of the tail and trim across. Weave in the pesky ends.
Hope you enjoy my bookmark.
Gone fishing bookmark

Gone Fishing instructions.
May 2002
Fishing pole design was created
for a fathers day theme in a list I'm in.
yarn for pole
thread for line reel and fish
small amt of pipe cleaner
size F hook and size 7 steel hook
Pole:
with yarn, ch 30. Sc in second hook from end and in next 9 sts, ch 3 and slip st in same st, sc in next 7 sts, ch 3, slip stitch in same st, sc in next 12 sts, ch 3, and slip stitch in end. fasten off. weave in ends.
Reel:
W/ thread, ch 5, and slip st to form ring. Ch 3, 11 dc in ring. Slip stitch to 3rd ch of beg ch 3. fasten off. weave in ends.
attach reel with pipe cleaner or can hot glue line and reel to pole and use a small amt of yarn for handle.
Fish:
I used a varigated for (rainbow Trout)
ch 5, sl st to form ring.
Rnd 1: ch 3, 11 dc in ring. Sl st to 3rd ch of beg ch 3.
Rnd 2: ch 4, 4 tr in same st as joining. fasten off. weave in ends.
Hook:
use pipe cleaner to form hook.I made the hook and then made a loop to hold the thread line to.
Finishing:
attach everything and weave thread to pole for line.
Golden snitch bookmark

Golden Snitch Bookmark
By: Bren G.
Feb, 2002
need:
gold/gold knit cro sheen for ball
white/silver or silver silver knit cro sheen for the wings.
hook size 4 or 5 steel
cardboard piece
I used white/silver in picture.
This is my own design and in no way endorsed by the author or any shape and form of Harry Potter.This is my own copyrighted pattern. Please contact me for useage of the pattern.
Golden Ball:
with gold/gold Ch 5, slip stitch to form ring.
Rnd 1: Ch 3, 15 dc in ring. Join to 3rd ch of beg. ch 3. (16 sts).
Rnd 2: Ch 3, dc in same stitch. 2dc in each stitch around. slip stitch in 3rd chain of beg. ch 3. (32 sts).
Rnd 3: Ch 3, dc in same st. *dc in next stitch, 2 dc in next. Rep * to end. slip st in 3rd ch of beg. ch 3. (48 sts).
Rnd 4: Chain stitches til about 12-13 inches long. Sc in same chain as first one(to make a loop). SC around ball and slip stitch to first ch. Fasten off.
Wings: with either silver/silver or white/silver
(you will attach thread 15 ch's up on both sides from the long loop area to attach wings.)
Attach thread and chain 13.
Sc in 3rd ch from hook til end. SC into ball in next ch from attached.(you will be working toward the loop area when attaching to ball).
ch 1, turn, HDC in each chain up to 1 chain before the ch 3 group(picot)of first row.
Ch 3, turn, and sc in same area as ch 3 start and to the end of wing. (do not attach ball at this time).
ch 1, turn, hdc in next 7 chs, ch 3, and sc in base of ch 3 and to end of wing. 2 HDC in end of wing and then attach wing to ball 3 chs below 2nd attachment. (so that there is 2 chs between the second attachment and the third). Fasten off.
Do same for second wing.
Finishing::
use a piece of cardboard 3 1/2" to 4 1/2" long and wroap white 10-20 times and cut on one end.set aside. Then wrap gold 5-10 times and cut on end.
Put thread together and slip knot in center of loop on bookmark. Cut ends even, and weave in pesky ends.
Subscribe to:
Posts (Atom)
